Search This Blog

Showing posts with label quilled leaves. Show all posts

Wednesday, November 12, 2014

Quilled Cottage & Garden in Summer

Back again after a long break. Been quilling a lot of cards and qulling a wall hanging got delayed, but here I am back a with a sweet memory in quilling.  I was on a tour of the Alps & the beauty of the countrysides in Italy & Switzerland in September was awesome. Loved most the wooden or brickwall little country cottages with the window boxes in full bloom in various colours of flowers which is not to be seen in my country (Sri Lanka). The little gardens with so many variety of beautiful flowers looked like a dream to me. I just wanted the memories to last for ever in my life. So this is the outcome of my memory. The dream house.

 the size of it is 32 × 25 cm
It took me almost 80 hours to complete. Every little detail is in quilling. Wish I had more variety of coloured strips. There are places that the strip are as thin as a thread cause it is a 3D quilling. You may notice it if you look closer. I think I love this the most, of all my creations. 

Thursday, June 26, 2014

Quilled Mandarin duck near water garden

Don't quill often now not because I have lost interest in this hobby but I am into other craft & I do not want to add those, on to my quilling blog. May be I will start another blog for those. Another reason for not quilling is I have lost ideas for quilling. I like to quill something that has not been quilled before. Now to this particular quilling. The mandarin duck is a beautiful creature like the peacock that it's beauty never cease to fascinate me. I love the bright colours and is a great idea for quilling but every duck I googled was different in colour from each other. So I quilled my own version. The entire picture is quilled with A4 coloured paper cut into 1/8 inch strips. I am a bit sad cause the real picture looks better than this & I cannot show it to you. Hope you like it :) 

Wednesday, April 9, 2014

A quick & simple method of making a flower for a card

A lady in a quilling group on Face Book had commented on a picture of mine that the group admin had posted. It was the picture of my comb collection on my blog. She had referred to this particular comb tool in the above picture, as " torture device" and could not make out the purpose for it. It made me laugh but also made me think. So I stopped my current quilling project to quickly do a tutorial on how I make flowers with it. Now dear friends don't bother torturing  your brains on how to get one like this. I have used part of a hard tooth tintin hair brush that comes with some hair product. I got it from a friend so I have no idea what it is. But I can give you an idea how to make one. Call it AnastasiaW style ha..ha.. My way of creating tools. Just an eraser and 6 needles or pins. Insert it the way it is in the picture and create a flower. Happy quilling :)

Wednesday, March 26, 2014

Video demonstration on quilling a flower

Today I would like to share a video tutorial on how I create this flower with a homemade tool. All you need for the tool is an eraser and 5 needles or pins. Also I have demonstrated a very easy and accurate method of doing the mount and valley fold & all you need to do it is a strp of aluminium foil. This is how I do it may be you too do this way but this tutorial is for people who do not know it :)

You can make the flowers big or small by the spacing of the three pins in the straight line. This design is suitable for earrings too. The mount and valley fold method is useful, if you don't have a crimping tool. Hope this video would be helpful to you. Have a nice day friend & happy quilling :)

Wednesday, March 6, 2013

Quilling Ideas for a sprig of leaves useing a comb


 This time I have decided to show you how I quill leaves for various projects. When a landscape quilling is done, you need different types of leaves  to make the picture look realistic. This is one of my filler leaves. You may be using it too but there may be many who do not know and would like to learn how to do it.

You can do it with a comb, but hear I have used a plastic hair brush, used to tint hair(I have used a tint brush that comes with LOREAL hair tint product) . It is like the brush in pic.1. I have cut it in two as it is easy to twist the paper. Pic.2 shows how to pass it through the teeth in a zig zag pattern. Pic.3 shows, how to apply glue, so you could paste the strip of paper.4 is how the strip is turned round and glued.5 shows that you should press it hard till it is well pasted.  6. shows how the glued back looks. It should be very neat and well adjusted. When it is dry take it out, and it should look like pic.7. In 8 you should press down and flatten the glued strip.
Now make another one in the same manner. Glue both parts to look like pic.11.

You can use  it to fill in flower baskets and any other projects that need leaves.    You can also glue all the petals the way I have shown in pic 10 and create another leaf design, like  the 2nd one in the picture below. I will try to show you more designs created with combs as and when possible.  Add a comment hear if you need any help :)

Thursday, October 18, 2012

The Leopard of Sri Lanka in paper quilling (Quilled)

Many of my friends have qilled the tiger. Some have done the full tiger and some have done the face only. My ambition was to quill a lion but my friend Paula (ON FB) had done two very beautiful quillings of the tiger's face. This inspired me to do a leopard. I usually try not to quill what someone has already done. So this seems to be a good idea. It wasn't an easy task. The picture is only 8"x12". The quilled pieces are extremely small. So many bits to be quilled but I think it was worth all my trouble. I would not quill for a while as Christmas is round the corner and it means extra work and preparations but not for long. Will be back with a Christmas creation. Have fun and add a comment if you have time :)

Friday, October 12, 2012

Basket of Fruits (Quilled)

Sorry for keeping my visitors and followers for nearly a month with no posts. But you have not kept away from visiting my blog cause my visitors count has only increased and so has the followers. Thank you so much. I did not have my PC and it was difficult to get on the Internet.

A basket of fruits was on my mind for some time, but there was no motivation to quill it. With no PC, it gave me plenty of free time to quill. Hope you like it as much as my other quillings. I am on to the next project and a posting will be done soon. Thanks for all your support and comments on my work :)

Friday, November 4, 2011

Sweet Leaves Blog Hop

Hi friends, to day is Sweet leaves Blog Hop. I am sure you all would enjoy going through all the blogs that are participating in this very interesting blog hop. Make sure you do. It would give you a lot of new ideas. I am eagerly waiting to see what the others have done cause they are all expert quillers and I am sure they would have beautiful creations. I enjoyed quilling leaves for this blog hop.There is just one which is a card I made for mum and is a Ikebana leaf arrangement. All the rest are different shapes of leaves you could make use of. No matter from which blog you arrived hear,  make sure you visit all the other blogs in the list below. Hope you like what I have posted and  enjoy browsing through. Will be back soon with another post . Have fun and take care :)
SANDY, THANK YOU FOR GIVING ME THIS OPERTUNITY.  There are many very talented quillers and handy craft artists in Sri Lanka and I wish they would make use of the internet to show the world their talent

               A BIG THANK YOU, TO ALL THE LOVELY COMMENTS AND COMPLIMENTS
                     YOU GAVE ME ON THIS BLOG HOP. I APPRECIATE IT VERY MUCH


Jenniferhttp://www.creative quilled creations.blogspot.com/
Paula
Lindahttp://www.myquillingnest.com/
Shruti
Melissahttp://sleeplesswonder.blogspot.com/
AUSTRALIA

Bronwyn
SOUTH AMERICA
Reginahttp://regina-ribeiro.blogspot.com/
Matilde

Wednesday, May 18, 2011

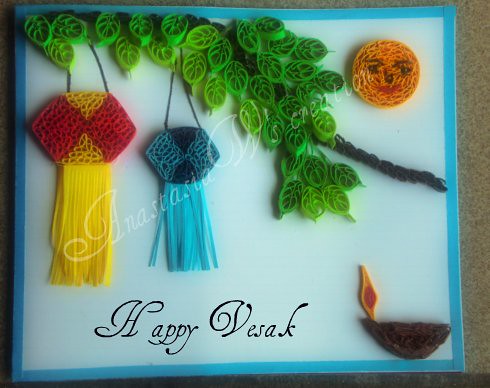
Wesak greetings

Vesak greetings by anastasiaw2008
Vesak greetings, a photo by anastasiaw2008 on Flickr.
This card is a dedication to all the Buddhist friends who are celebrating the Holy Wesak this year. I did not take much time quilling it. The tree is supposed to be a Bo tree which is very holy to the Buddhists. So you would notice the difference in my leaves from the other pictures. The moon, oil lamp, Bo tree and lanterns are symbols that is associated with Wesak